🔥 Crunchy, Cheesy, Sweet Magic: The Hawaiian Roll Grilled Cheese Sandwich You’ll crave Every Lunch!
1. Introduction
There’s nothing quite like the nostalgia of a classic grilled cheese—golden, buttery crusts hugging melty cheddar—but what happens when you elevate that comfort classic with something a little unexpected? Enter the Hawaiian roll grilled cheese: a clever hybrid of cozy familiarity and sweet-savory delight. Made with soft, slightly sweet Hawaiian rolls, this sandwich delivers a tender interior, a crisp exterior, and a surprising depth of flavor that makes simple weeknight lunches feel like a treat. I first tested this idea on a lazy Sunday afternoon while prepping for game day, and it quickly became my *go-to* fallback for hungry kids, last-minute guests, or just because—cheese and bread should always taste this good.
2. Why You’ll Love This Recipe
- Ready in under 15 minutes—perfect for busy weeknights or impromptu snacks
- No bread slicing or rolling required—just pull apart the rolls and stack!
- One-pan wonder: minimal cleanup, maximum flavor
- Highly customizable: swap cheeses, add ham, or finish with honey for a sweet twist
- Kid-approved (and adult-addicted): the subtle sweetness of the roll makes it universally loved
3. Ingredient Notes
The magic of this sandwich lives in the details—and choosing the right components makes all the difference. First, **Hawaiian rolls** (like those from Pepperidge Farm or a local bakery) are non-negotiable: their enriched dough (with milk, butter, and a touch of sugar) creates a tender, pillowy texture that crisps beautifully without turning stiff. Avoid subbing in regular sandwich bread—it won’t yield the same delicate, layered crunch.
For cheese, I recommend a sharp white cheddar or Gruyère blend. Sharp cheddar offers bold, tangy notes that cut through the roll’s sweetness, while Gruyère adds nutty complexity and superior melt. Pre-grated cheese often含有 anti-caking agents that interfere with smooth meltdawn—so grate your own blocks for velvety gooeyness. And don’t skip the high-quality unsalted butter: it gives you control over salt levels and delivers a rich, golden crust. (A European-style cultured butter? Even better.)
4. Kitchen Tools You Need
While a cast-iron skillet works beautifully, having the right tools ensures consistent, restaurant-grade results—especially when scaling up for a crowd.
For stovetop precision, the T-fal 14-Piece Hard Anodized Nonstick Cookware Set is a kitchen powerhouse: its even-heating bases prevent hot spots and make flipping those sticky rolls a breeze. If you love versatility, the Ninja Foodi Smart XL Indoor Grill & Air Fryer Combo delivers grill marks, air-crisping, and broiling—all in one sleek unit. It’s especially handy for making multiple sandwiches at once without crowding the pan.
For those who love efficiency, the Compact 6-in-1 Digital Air Fryer by Amazon Basics offers a quick, hands-off route: preheat in 3 minutes, and you’ll get evenly browned edges with zero flipping. And if you’re serious about home cooking essentials, the Deluxe 33-Piece Silicone Utensil Set includes heat-safe spatulas and spreaders perfect for coating rolls in butter without scratching your cookware.
5. How to Make Hawaiian Roll Grilled Cheese
Phase 1: Prep & Preheat
Remove one 12-count package of Hawaiian rolls from its bag (keep them fresh until use). Split each roll horizontally—no knife needed! Just tear or gently twist apart. Set aside.
In a small bowl, softly whip 4 tablespoons of room-temperature unsalted butter with 1 teaspoon of fine sea salt and a pinch of garlic powder (optional, for savory flair). Set aside.
Heat a large nonstick or cast-iron skillet over medium-low heat—too hot, and the bread will burn before the cheese melts. While warming, evenly spread a thin layer of the seasoned butter on the *outer* faces of each roll half. This is your crust-building stage.
Phase 2: Stack & Press
Place four roll halves bottom-side-up in the skillet. Immediately pile 2–3 tablespoons of shredded cheese on each, pressing down lightly. Top with the remaining roll halves (buttered side up). Let sit undisturbed for 2–3 minutes—you’ll hear a faint sizzle, and the bottom will turn a deep, even gold.
Use a wide spatula to carefully flip each sandwich. Press down gently for 2–3 more minutes until the second side is equally crisp and golden. The internal cheese should be bubbling and pulling in long, stretchy strands when pierced. If your skillet is small, cook in batches—crowding steams, not sears.
Phase 3: Final Touch & Serve
Transfer sandwiches to a cutting board. Let rest 1 minute (this helps the cheese set slightly—no melted oozing disaster!). Slice each sandwich in half diagonally to reveal those beautiful, cheese-stuffed layers. Garnish with chopped parsley or a light dusting of flaky sea salt, and serve warm.
6. Expert Tips for Success
From trial-and-error in my own kitchen, here’s what I’ve learned:
- Cheese temperature matters: Cold cheese firms up and resists melting. Let it sit at room temp for 10 minutes before using.
- Butter thickness is key: Too thick = greasy, splattering mess. Too thin = pale, soggy bread. Aim for a coat as thin as tissue paper.
- Low and slow wins the race: Medium heat gives the cheese time to melt while the crust develops color. Rushing = burnt outside, cold center.
- Add-ins? Yes—but strategically: A few thin slices of applewood-smoked bacon or a dollop of grainy mustard between the cheese adds complexity—but don’t overload. Keep the cheese-to-filler ratio at 3:1.
7. Variations & Substitutions
For a sweet twist: Spread a light layer of honey or apricot jam inside the sandwich *before* adding cheese. Finish with a drizzle of honey and a sprinkle of black pepper—a sweet-heat combo that’s strangely addictive.
Gluten-free? Try: Gluten-free dinner rolls (look for one with xanthan gum for structure). Pan-fry in avocado oil to avoid cross-contamination.
Dairy-free? Use: Violife or Melt Organic cheddar-style slices, and swap butter for vegan margarine infused with a touch of nutritional yeast for depth.
High-protein upgrade: Add sliced deli turkey or pulled rotisserie chicken between the cheese layers—and pair with a side of our Sweet & Spicy Honey Pepper Chicken for a full-protein feast.
8. Storage & Reheating
Cooked sandwiches keep well sealed in the fridge for up to 3 days. But avoid freezing—they turn gummy when thawed.
Reheat only in a dry skillet over medium-low, covered for 2 minutes per side, or in an air fryer at 325°F for 2–3 minutes. **Never microwave**—it turns the crust chewy and makes the cheese rubbery. (Pro tip: Place a damp paper towel *over* the sandwich in the microwave if desperate—but the texture suffers.)
9. FAQ
Can I use Hawaiian rolls in an air fryer? Absolutely! Preheat to 350°F, butter the outsides, stack with cheese, and air fry for 4–5 minutes, flipping halfway. For extra crispiness, broil for 30–60 seconds at the end.
Why is my grilled cheese soggy? Most likely: the pan was too cool, or the sandwiches were stacked while still steaming in a covered dish. Let yours cool uncovered on a wire rack before storing—or better yet, eat fresh!
What cheese melts best? Mozzarella stretches, but cheddar, Gruyère, and fontina offer the richest flavor and creamiest texture when melted together.
Can I make this ahead for guests? Yes! Prep the butter mixture and shredded cheese the night before. Assemble cold right before cooking—don’t stack pre-assembled sandwiches ahead, or the bread gets moist.
10. Conclusion
The Hawaiian roll grilled cheese proves that joy lives in simplicity—and that small tweaks can turn a childhood staple into a grown-up favorite. With its sweet-tangy balance, ultra-crisp crust, and lava-like cheese pull, it’s comfort food with flair. Whether you’re hosting for the Super Bowl, a cozy Tuesday dinner, or just need a 10-minute palate reset, this sandwich delivers. Grab those rolls, grab your cast iron—and let the crunch begin.
Print
Quick Grilled Cheese Sandwich with Hawaiian Rolls
A 15-minute upgraded grilled cheese sandwich using soft, slightly sweet Hawaiian rolls filled with melted cheese and grilled until golden and crispy.
- Total Time: 15 minutes
- Yield: 2 servings 1x
Ingredients
- 4 Hawaiian dinner rolls
- 4 slices American cheese
- 2 slices sharp cheddar cheese
- 4 tbsp unsalted butter, softened
- Salt, to taste
Instructions
- Cut each Hawaiian roll horizontally, keeping the top and bottom halves attached like a hinge.
- Place 1 slice of American and ½ slice of cheddar between the two halves of each roll.
- Butter the outer faces of each roll and season lightly with salt.
- Heat a skillet over medium heat and grill each sandwich for 2–3 minutes per side, until golden brown and cheese is melted.
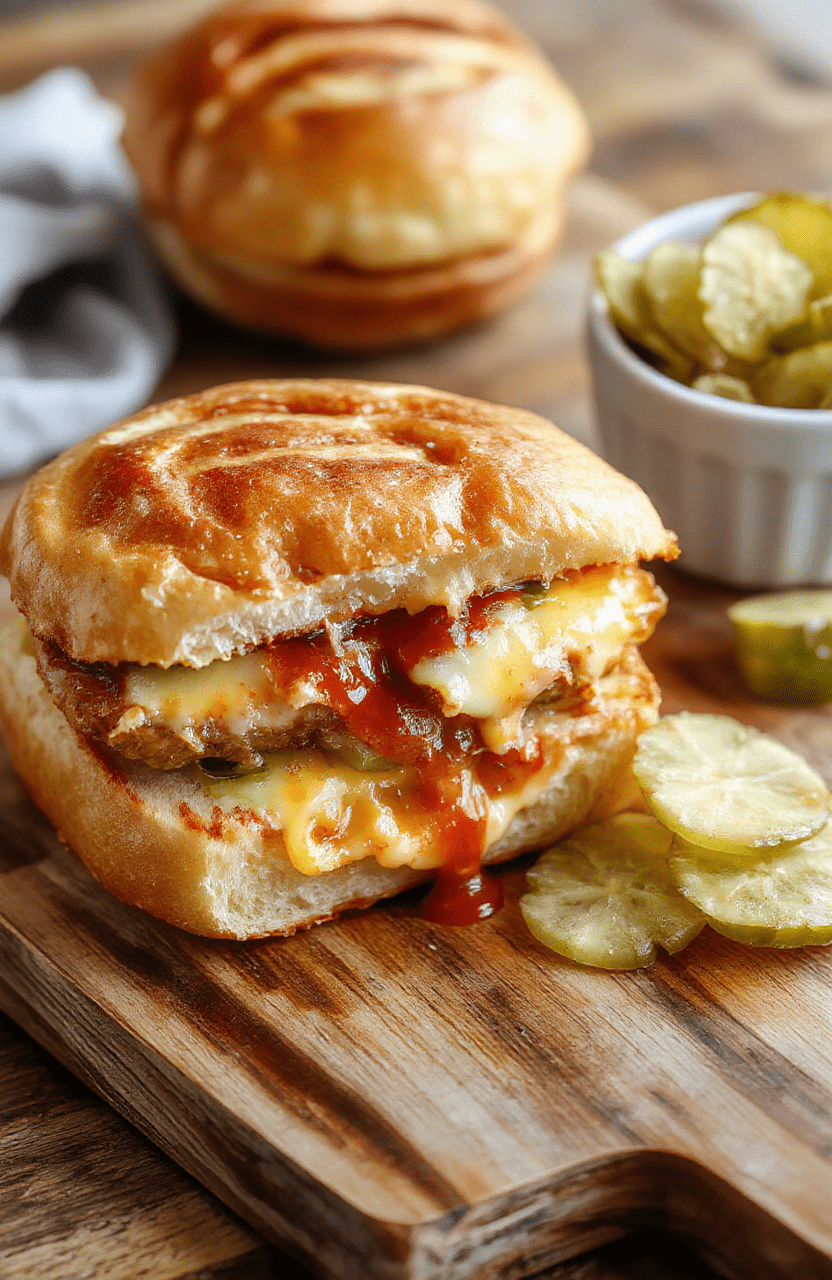
- Serve warm with optional ketchup or pickles on the side.
Notes
- For extra flavor, add a thin layer of Dijon mustard Inside the sandwich before closing.
- Use a pizza cutter to slice sandwiches in half diagonally for cute presentation.
- Hawaiian rolls stay softer longer, making them ideal for reheating leftovers.
- Prep Time: 5 minutes
- Cook Time: 10 minutes
- Method: Pan-frying
- Cuisine: American
- Diet: Vegetarian
Nutrition
- Serving Size: 1 sandwich
- Calories: 420 Kcal
- Sugar: 7g
- Sodium: 580mg
- Fat: 24g
- Saturated Fat: 14g
- Unsaturated Fat: 8g
- Trans Fat: 0g
- Carbohydrates: 40g
- Fiber: 2g
- Protein: 12g
- Cholesterol: 60mg